
DIY Ideas for Customizing Your Iowa State Jersey or T-Shirt
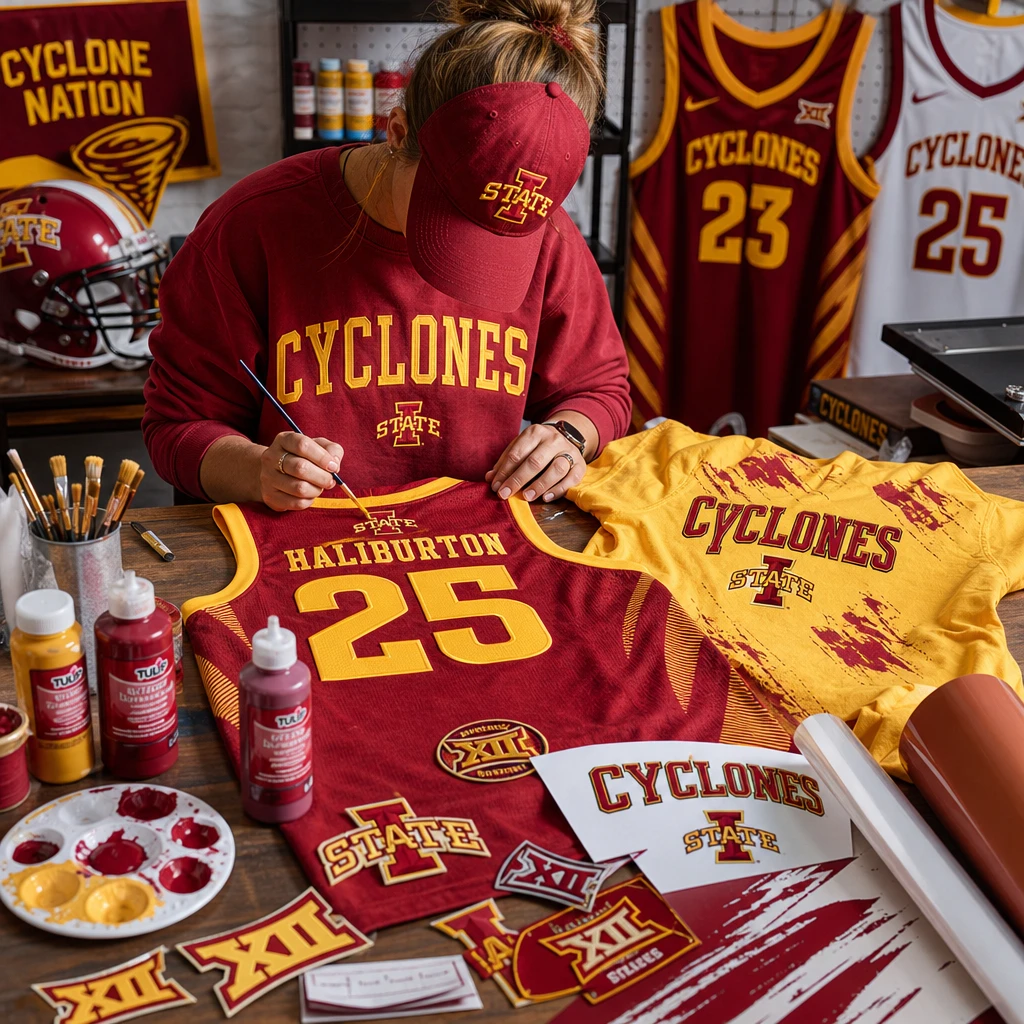
A few thoughtful details can turn an Iowa State Cyclones jersey or T-shirt into a game-day piece that feels distinctly yours. With the right materials and a little planning, you can add cardinal-and-gold accents, lettering, or a small fan-inspired design while keeping the garment comfortable and wearable.
Start by checking the fabric and care label, then choose a method that suits both the garment and your experience. A fabric marker is quick for a small doodle; embroidery takes more patience but adds texture. Before decorating, avoid covering existing logos, numbers, or other details you want to keep visible.
Choose an Apparel Piece and Plan Your Design
Choose a jersey or T-shirt based on its fabric, fit, and existing graphics, then sketch a design sized for the space you plan to decorate. A simple layout helps you add Iowa State pride without crowding the garment.
A T-shirt usually offers a broad, flat area that works well for lettering, fabric paint, or a small chest design. A jersey may have mesh panels, stitched details, numbers, or sponsor and team graphics, so it calls for more careful placement. Check the construction first: delicate mesh and raised lettering may not tolerate the same tools or pressure as a smooth cotton tee.
Sketch your idea on paper and mark its approximate dimensions. Consider a cardinal outline on a sleeve, a gold star near a hem, or a small fan message on the back shoulder. Try the shirt on and use removable tape to preview placement in a mirror. Leave breathing room around existing graphics, and keep any design away from seams that bend or rub against the body.
Plan around the garment, not just the artwork. A design that looks balanced on paper may sit awkwardly over a number or disappear into a fold. If you are customizing official-looking apparel, keep your additions personal and do not imply team approval or endorsement.
Gather Materials for a Clean, Lasting Customization
Gather materials suited to your fabric and chosen technique, and check both the garment’s care label and the craft product’s instructions before you begin. A small test on a hidden area can reveal problems before they affect the finished design.
For most beginner projects, prepare:
- Fabric paint or fabric markers for drawn accents and lettering
- Iron-on patches or heat-transfer vinyl (HTV) for applied shapes and text
- Embroidery floss and a suitable needle for hand-stitched details
- Scrap fabric or parchment recommended by the product maker, plus scissors and a ruler
- A pressing cloth or firm work surface when the instructions call for one
Work on a clean, dry garment and place a piece of cardboard inside a T-shirt before painting or marking. It helps prevent color from bleeding through to the other side. For a jersey, check whether the fabric is stretchy or mesh; a stiff transfer can feel uncomfortable or lift when the material flexes. Do not assume that every synthetic fabric can take direct heat. If the label warns against ironing, choose a no-heat method such as fabric markers or carefully placed embroidery instead.
Test first, then commit. Apply a small amount of paint or marker to an inconspicuous spot and let it dry as directed. For a patch or HTV, confirm the maker’s recommended temperature and pressing method; guessing can damage fabric or leave an attachment that does not hold.
Add Cardinal-and-Gold Details with Fabric Paint or Markers
Fabric paint and fabric markers are easy ways to add cardinal-and-gold color, small lettering, and simple fan-inspired accents. Use thin layers and test the color on the garment first, since fabric texture and color can change how the finished mark looks.
For fabric paint, place cardboard inside the garment and lightly sketch the design with tailor’s chalk or another removable marking tool. Apply paint in thin coats with a small brush or sponge, letting each coat dry according to the label before adding another. Thick paint may crack or feel stiff, especially on an area that stretches when you move.
Fabric markers are better for fine lines, short phrases, and small shapes. Draw slowly on a flat surface, and avoid pressing so hard that the tip catches on knit fabric. For a clean cardinal-and-gold motif, outline a simple star or swirl in one color and add a few smaller marks in the other. Keep your design original and check that the ink or paint is intended for fabric.
Follow the product’s setting directions exactly. Some paints and markers require air-drying or heat-setting, while others have different instructions. Do not use an iron on a jersey unless the garment label and product directions both allow it. Small accents tend to wear better than a large, heavily painted area, and they leave the fabric more flexible.
Personalize It with Patches, Heat-Transfer Vinyl, or Embroidery
Iron-on patches, heat-transfer vinyl, and embroidery each create a different finish: patches add a ready-made motif, HTV gives crisp lettering or shapes, and embroidery adds stitched texture. Choose one main technique and use any second method sparingly to keep the garment balanced.
Choose the method that fits the fabric
A patch is a straightforward way to add a small visual detail to a stable area of a T-shirt. Follow the patch maker’s directions and check whether the backing is designed for your fabric. A sew-on patch can be a better option than an iron-on one when heat is unsuitable, though stitching takes longer.
HTV works well for clean names, short words, and simple shapes. Cut the design according to the vinyl maker’s instructions, position it carefully, and use the required temperature, pressure, and pressing time. Keep HTV away from mesh, seams, and raised graphics unless the product is specifically suitable for those surfaces. A transfer that crosses a stretchy panel may wrinkle or peel as the jersey moves.
Hand embroidery is a low-heat option for small details such as a star, a short initial, or a simple outline. Use a needle appropriate for the fabric and avoid pulling the thread so tight that it puckers the garment. Because stitching can catch on mesh or delicate knits, try it first on a stable section or choose a T-shirt for your first embroidery project.
For any method, position the design before attaching it and step back to check scale. A single detail at a sleeve or chest is often more wearable than decorating every open space.
Make a Game-Day Design That Feels Personal
A personal game-day design can combine Iowa State colors with a name, number, mascot-inspired motif, or memory that matters to you. Keep the artwork readable from a few feet away and leave existing jersey graphics and numbers unobstructed.
Think about how you will wear the piece. A small cardinal-and-gold sleeve accent pairs easily with jeans, while a short phrase on the back shoulder can make a plain T-shirt feel more individual. You might add initials, a lucky star, or a date tied to a favorite game. For names or numbers, choose a size and placement that complement the original design rather than competing with it.
Use a simple three-part check before applying anything:
- Visibility: Can you read the design without covering an existing logo or number?
- Comfort: Will the decoration rub, stiffen, or pull when you move?
- Wearability: Can you pair the piece with the rest of your game-day outfit?
This check helps avoid a common DIY mistake: adding more details simply because there is room. One well-placed feature often looks more intentional than several competing graphics. If you are making apparel for a group, agree on a shared color or motif while letting each person choose a small individual detail.
Protect Your Customized Jersey or T-Shirt
Protect a customized jersey or T-shirt by following the care instructions for both the garment and each decoration. Let paint, ink, adhesive, or stitching settle as directed before wearing or washing the piece.
Before the first wash, check whether the product maker requires heat-setting or a waiting period. Turn the garment inside out, use the care-label wash temperature, and choose a gentle cycle when the label allows. Avoid bleach unless the garment and decoration instructions specifically permit it. Air-drying can reduce stress on painted areas and transfers; use a dryer only if the care guidance allows it.
Inspect patches and HTV occasionally, especially around edges. If an edge lifts, follow the product maker’s repair directions rather than applying extra heat at a temperature that could harm the fabric. Store the garment clean and dry, ideally folded so a transfer or embroidered section is not sharply creased. For ironing, avoid decorating directly over the design; use the garment and product instructions to determine whether a protective cloth or low-heat method is appropriate.
Frequently asked questions
Can I customize a jersey without damaging it? Yes, if you choose a fabric-compatible method, test it in a hidden spot, and follow the care label. Avoid unapproved heat on mesh or synthetic materials.
Which DIY method is easiest for beginners? Fabric markers are often the simplest for small designs because they need little setup. Still, test the marker first and follow its drying and setting directions.
Can I use heat-transfer vinyl on a jersey? Sometimes. Confirm that the jersey fabric can tolerate the vinyl’s required heat and pressure, and avoid mesh or raised graphics unless the product instructions say it is suitable.
How should I wash customized apparel? Follow the garment and decoration instructions, turn it inside out when appropriate, and avoid harsh washing or drying conditions that could loosen or wear the design.